Tuesday, November 8, 2016

Add storage Proxmox

1. Create External LVM storage

Extra added hard drives without partitions.
Installation:
SDA is the drive where the proxmox installation is running
SDB is the new drive that will be added to the proxmox.
- Open the Proxmox Shell

With fdisk you can find your drives that you want to add, if you are not sure what the device name is for your hard drive that you want to add. 
Type: fdisk -l


Find the "Disk" with no valid partition table. That will be probably your hard drive you want to add.
        "Disk /dev/sdb doesn't contain a valid partition table"

To make a partion on the new drive type the following:
T   - type cfdisk /dev/sdb

Choose the following options:
New - Primary - Specify size in MB Write Quit

Now a physical volume has to be created.
- type pvcreate /dev/sdb1

Create a volume group. The name "Data-Storage" is an example. You can name it anyway you want. Consider a logical name, because this is the name that will be used in the proxmox web interface:

Type: vgcreate Data-Storage /dev/sdb1

Add the storage in ProxMox
 
-       In the webinterface click on the directory Datacenter and then click
        on tab Storage.

-       Click AddLVM Group

o    Type an ID Name for example data-storage

o    Base Storage: Existing Volume Groups

o    Volume Group: Data-Storage

o    Enabled: Checked
o    Other options should be adjusted accordenly to what you want
      with it. 

Now the extra storage has been added in Proxmox and ready for use.


2. Mounting external HDD to be add to directory backup file
 
Startup the server and run the following from commandline to find the device name for the disk:
  1. fdisk -l
This should return something similar to this:
  1. Disk /dev/sda: 21.4 GB, 21474836480 bytes
  2. 255 heads, 63 sectors/track, 2610 cylinders
  3. Units = cylinders of 16065 * 512 = 8225280 bytes

  4. Device Boot Start End Blocks Id System
  5. /dev/sda1 * 1 2517 20217771 83 Linux
  6. /dev/sda2 2518 2610 747022+ 5 Extended
  7. /dev/sda5 2518 2610 746991 82 Linux swap / Solaris

  8. Disk /dev/sdb: 32.2 GB, 32212254720 bytes
  9. 255 heads, 63 sectors/track, 3916 cylinders
  10. Units = cylinders of 16065 * 512 = 8225280 bytes

  11. Disk /dev/sdb doesn't contain a valid partition table
If it is the first new disk you have added it will more than likely be /dev/sdb as the device name.
Now we partition the disk:
  1. cfdisk /dev/sdb
Select the following options:
  • New > Primary > Enter (use the size in MB already specified)
  • Write
  • Quit
Now we format the disk to the ext3 filesystem:
  1. mkfs.ext3 /dev/sdb1
Mount the drive to a new folder:
  1. mkdir /mnt/backups
  2. mount -t ext3 /dev/sdb1 /mnt/backups
Lastly we add the disk to /etc/fstab so it auto-mounts when we reboot the machine:
  1. /dev/sdb1 /mnt/backups ext3 defaults,errors=remount-ro 0 1
That’s your drive mounted and ready to be added as backup storage in Proxmox.
To test: reboot the machine and confirm that the drive is still mounted.
 

Saturday, July 16, 2016

JUNOS RIP OSPF routes Redistribution


IN FIGURE 1 WE SHOW A TOPOLOGY THAT IS RUNNING OSPF AND RIP. THIS LAB IS DESIGNED ON VMWARE JUNIPER OLIVE. THE GOAL FOR THIS TOPOLOGY IS SIMPLE: ROUTES REDISTRIBUTION BETWEEN ROUTERS. SO LET'S START:


1 Configuration on Juniper 1

1.1 Configure RIP protocol:

[edit]

root@juniper1# set interface em0.0 family inet address 192.168.3.1/24

root@juniper1# set interface em1.0 family inet address 10.1.1.5/24 ('this interface is used for test purposes)

root@juniper1# set protocols rip group small-rip neighbor em0.0

1.2 Configure RIP policy:

Default policy of RIP is to send out no routes unless explicitly

told to do so. In order to begin sending out routes, first write a policy on Juniper 1 that sends the locally connected interface routes into RIP:

[edit]

root@juniper1# set policy-options policy-statement send-connected term 1 from protocol direct

root@juniper1# set policy-options policy-statement send-connected then accept

1.3 Apply the policy to RIP:

[edit]

root@juniper1# set protocols rip group small-rip export send-connected

2 Configuration on Juniper 2:

2.1 Configure RIP protocol on interface em1:

[edit]

root@juniper2# set interface em0.0 family inet address 192.168.1.2/24

root@juniper2# set interface em1.0 family inet address 192.168.3.2/24

root@juniper2# set protocols rip group small-rip neighbor em1.0

2.2 Configure RIP policy:

root@juniper2# set policy-options policy-statement send-connected term 1 from protocol direct

root@juniper2# set policy-options policy-statement send-connected then accept

2.3 Apply the policy to RIP:

[edit]

root@juniper2# set protocols rip group small-rip export send-connected

2.4 Configure OSPF protocol on interface em0:

[edit]

root@juniper2# set protocols ospf area 100 interface em0.0

2.5 Next, Juniper 2 must take the routes it receives from RIP and redistribute them into OSPF, for this purpose create the following policy:
[edit]

root@juniper2# set policy-options policy-statement rip-ospf term 2 from protocol rip

root@juniper2# set policy-options policy-statement rip-ospf then accept

2.6 Apply the policy to OSPF:

[edit]

root@juniper2# set protocols ospf export rip-ospf

2.7 Now, create the policy for routes redistribution from OSPF into RIP :

[edit]

root@juniper2# set policy-options policy-statement send-default term 1 from protocol ospf

root@juniper2# set policy-options policy-statement send-default then accept

2.8) Apply the policy to RIP :

root@juniper2# set protocols rip group small-rip export send-default

3 Configuration on Juniper 3:

3.1) Configure OSPF protocol on interface em0:

root@juniper3# set interface em0.0 family inet address 192.168.1.5/24

root@juniper3# set interface em1.0 family inet address 10.1.1.1/24

root@juniper3# set protocols ospf area 100 interface em0.0

Now, routes from Juniper 1 are advertised to both routers Juniper 2 and Juniper 3. You can test it with ping command.

Thursday, June 9, 2016

VPN Mikrotik and shrew client -- roadwarrior

Contents

Overview

This article shows how to connect Shrew Ipsec client to RouterOS Ipsec server.
Shrew client works on both Windows (without need of L2TP) and Linux, see more details in their website

RouterOS Configuration

Lets assume that we already have IP connectivity between client and server. Client's IP address will be 10.5.101.20 and servers IP address will be 10.5.101.3.

IPSec configuration

/ip ipsec peer 
  add address=10.5.101.20/32 auth-method=pre-shared-key exchange-mode=main\
  secret=123 hash-algorithm=md5 enc-algorithm=3des generate-policy=yes
Since we assume that it is Road-Warrior setup, we do not know from where client will be connecting, so generate-policy=yes should be set.

The rest of the configuration is default

Shrew client configuration

Now we need to match configuration on Shrew client. And assume that we want to reach remote network 99.77.77.0/24 located behind router from Shew client
Icon-note.png
Note: RouterOS does not support modecfg and xauth. We need to disable every dynamic option in shew


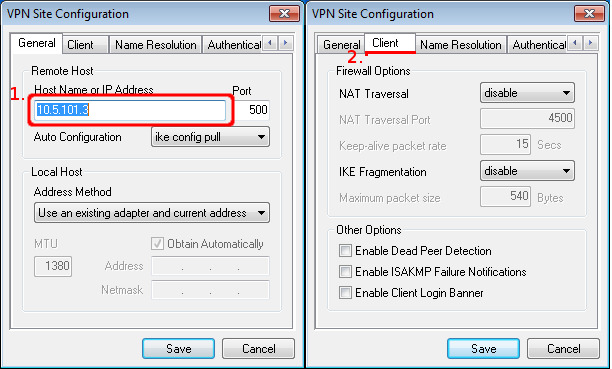
  • On the first configuration tab ("General") we simply specify server's IP address.
  • On the second tab ("Client") disable any features that you do not want to use. In this case we are not using NAT-T, DPD, etc. So all of them are disabled.
Shew1-2.png


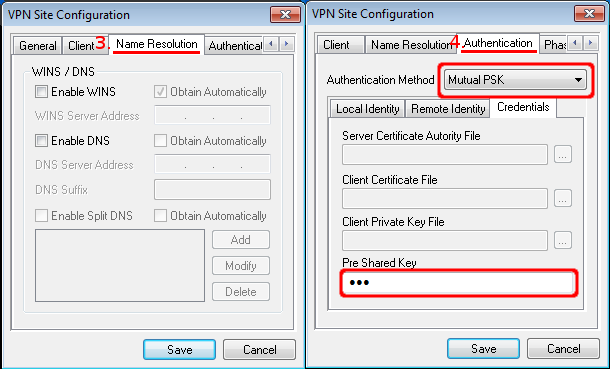
  • On the third tab ("Name Resolution") we disable everything since these options are used by modecfg, which is not supported on ROS.
  • On the fourth tab In our case we are using pre shared key, so choose Mutual PSK and enter pre shared key.
Shew3-4.png


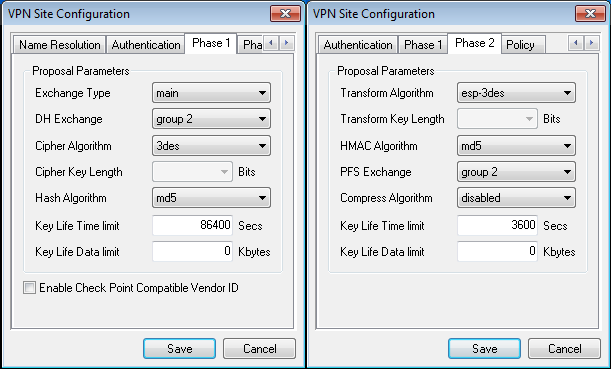
  • On "Phase1" and "Phase2" tabs we match configuration to the RouterOS config. Phase1 should match /ip ipsec peer config and Phase 2 should match /ip ipsec proposal config
Shew5-6.png


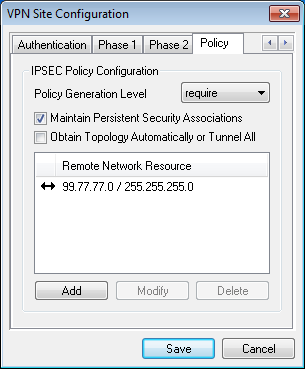
  • And the last one we manually set which network we want to reach so that Ipsec can generate proper policies.
Shew7.png

Here is the whole Shew config, you can import it in your client
n:version:2
n:network-ike-port:500
n:network-mtu-size:1380
n:network-natt-port:4500
n:network-natt-rate:15
n:network-frag-size:540
n:network-dpd-enable:0
n:client-banner-enable:0
n:network-notify-enable:0
n:client-wins-used:0
n:client-wins-auto:1
n:client-dns-used:0
n:client-dns-auto:0
n:client-splitdns-used:0
n:client-splitdns-auto:0
n:phase1-dhgroup:2
n:phase1-life-secs:86400
n:phase1-life-kbytes:0
n:vendor-chkpt-enable:0
n:phase2-life-secs:3600
n:phase2-life-kbytes:0
n:policy-nailed:1
n:policy-list-auto:0
s:network-host:10.5.101.3
s:client-auto-mode:pull
s:client-iface:direct
s:network-natt-mode:disable
s:network-frag-mode:disable
s:auth-method:mutual-psk
s:ident-client-type:address
s:ident-server-type:address
s:ident-client-data:10.5.101.20
s:ident-server-data:10.5.101.3
b:auth-mutual-psk:MTIz
s:phase1-exchange:main
s:phase1-cipher:3des
s:phase1-hash:md5
s:phase2-transform:esp-3des
s:phase2-hmac:md5
s:ipcomp-transform:disabled
n:phase2-pfsgroup:2
s:policy-level:require
s:policy-list-include:99.77.77.0 / 255.255.255.0

Check Connectivity

[admin@MikroTik] /ip ipsec remote-peers> print 
 0 local-address=10.5.101.3 remote-address=10.5.101.20 state=established 
   side=responder established=44m3s 

  • IPSec should show intalled-sa,
[admin@MikroTik] /ip ipsec installed-sa> print 
Flags: A - AH, E - ESP, P - pfs 
 0 E  spi=0x476464 src-address=10.5.101.20 dst-address=10.5.101.3 
      auth-algorithm=md5 enc-algorithm=3des replay=4 state=mature 
      auth-key="fae8bc2918fea03dac0b7c8b6db57c60" 
      enc-key="15627d42163ad1fd58ee7cdc80d971d334883dbd2d81c42c" 
      addtime=sep/27/2012 13:51:07 expires-in=15m32s add-lifetime=48m/1h 
      current-bytes=240 

 1 E  spi=0x5D4BF3B9 src-address=10.5.101.3 dst-address=10.5.101.20 
      auth-algorithm=md5 enc-algorithm=3des replay=4 state=mature 
      auth-key="728b19191d2a111673298c07d1f459c2" 
      enc-key="c944c45447df5429860d3999e674e1689bb41527ec941c9a" 
      addtime=sep/27/2012 13:51:07 expires-in=15m32s add-lifetime=48m/1h 
      current-bytes=240 


  • And dynamically created policies
[admin@MikroTik] /ip ipsec policy> print 
Flags: X - disabled, D - dynamic, I - inactive 
 
 1 D src-address=10.5.101.20/32 src-port=any dst-address=99.77.77.0/24 
     dst-port=any protocol=all action=encrypt level=require ipsec-protocols=esp 
     tunnel=yes sa-src-address=10.5.101.3 sa-dst-address=10.5.101.20 
     proposal=default priority=2 

 2 D src-address=10.5.101.20/32 src-port=any dst-address=99.77.77.0/24 
     dst-port=any protocol=all action=encrypt level=require ipsec-protocols=esp 
     tunnel=yes sa-src-address=10.5.101.3 sa-dst-address=10.5.101.20 
     proposal=default priority=2 

 3 D src-address=99.77.77.0/24 src-port=any dst-address=10.5.101.20/32 
     dst-port=any protocol=all action=encrypt level=require ipsec-protocols=esp 
     tunnel=yes sa-src-address=10.5.101.20 sa-dst-address=10.5.101.3 
     proposal=default priority=2 


Allow only encrypted traffic

We want local network behind the server to be reachable only by VNP users using encryption and drop other un-encrypted access. To do so we will need to set up firewall on the router.
First step is to allow ispec related packets. Rules allows also AH protocol and NAT-T port, which is not used in current setup but added for future use.
/ip firewall filter
add chain=ipsec protocol=ipsec-esp
add chain=ipsec protocol=ipsec-ah
add chain=ipsec protocol=udp src-port=500
add chain=ipsec protocol=udp src-port=4500
Now we add the typical rules to allow established/related connections in input chain and jump to ipsec chain
/ip firewall filter
add chain=input connection-state=established
add chain=input connection-state=related
add action=jump chain=input in-interface=WAN jump-target=ipsec
After decrypting ipsec packets they appear in IP firewall like regular packets. For more information see packet flow example.
Now the trick is to determine which packets with destination (99.77.77.0/24) arrived over the ipsec tunnel. To do that we use mangle to mark ESP packets
/ip firewall mangle
add action=mark-packet chain=prerouting in-interface=WAN new-packet-mark=\
    ipsec-encrypted passthrough=no protocol=ipsec-esp
After packets are marked we can add firewall rules to accept encrypted packets and drop the rest
/ip firewall filter
add chain=input in-interface=WAN packet-mark=ipsec-encrypted
add action=reject chain=input dst-address=99.77.77.0/24
Do the same in forward chain
/ip firewall filter
add chain=forward connection-state=established
add chain=forward connection-state=related
add chain=forward in-interface=WAN packet-mark=ipsec-encrypted
add action=reject chain=forward dst-address=99.77.77.0/24

Testing firewall

After setting firewall connect Shrew client and run ping from the client to destination network.
C:\Users\T>ping 99.77.77.1 -t

Pinging 99.77.77.1 with 32 bytes of data:
Reply from 99.77.77.1: bytes=32 time=9ms TTL=64
Reply from 99.77.77.1: bytes=32 time<1ms TTL=64

We can see in mangle and filters that packets are successfully matched and accepted
[admin@MikroTik] /ip firewall mangle> print stats 
Flags: X - disabled, I - invalid, D - dynamic 
 #   CHAIN                ACTION                            BYTES         PACKETS
 0   prerouting           mark-packet                       2 240              20

[admin@MikroTik] /ip firewall filter> print stats chain=forward
Flags: X - disabled, I - invalid, D - dynamic 
 #   CHAIN                ACTION                            BYTES         PACKETS
 0   forward              accept                                0               0
 1   forward              accept                                0               0
 2   forward              accept                            1 500              25
 3   forward              reject                                0               0
Now disconnect shrew client and you will notice that immediately ping throws an error that network is unreachable
Reply from 99.77.77.1: bytes=32 time=17ms TTL=64
Reply from 99.77.77.1: bytes=32 time=4ms TTL=64
Reply from 99.77.77.1: bytes=32 time=1ms TTL=64
Request timed out.
Reply from 10.5.101.3: Destination net unreachable.
And in firewall filtes you will see that last five packets are rejected by the reject rule.
[admin@MikroTik] /ip firewall filter> print stats chain=forward
Flags: X - disabled, I - invalid, D - dynamic 
 #   CHAIN                ACTION                            BYTES         PACKETS
 0   forward              accept                                0               0
 1   forward              accept                                0               0
 2   forward              accept                           15 600             260
 3   forward              reject                              300               5

Thursday, May 26, 2016

Proxmox add second harddrive

Simplified steps to add a second hard drive to a Debian server running Proxmox.
Firstly physically install the Hard Drive in the server chassis.
Startup the server and run the following from commandline to find the device name for the disk:
  1. fdisk -l
This should return something similar to this:
  1. Disk /dev/sda: 21.4 GB, 21474836480 bytes
  2. 255 heads, 63 sectors/track, 2610 cylinders
  3. Units = cylinders of 16065 * 512 = 8225280 bytes
  4. Device Boot Start End Blocks Id System
  5. /dev/sda1 * 1 2517 20217771 83 Linux
  6. /dev/sda2 2518 2610 747022+ 5 Extended
  7. /dev/sda5 2518 2610 746991 82 Linux swap / Solaris
  8. Disk /dev/sdb: 32.2 GB, 32212254720 bytes
  9. 255 heads, 63 sectors/track, 3916 cylinders
  10. Units = cylinders of 16065 * 512 = 8225280 bytes
  11. Disk /dev/sdb doesn't contain a valid partition table
If it is the first new disk you have added it will more than likely be /dev/sdb as the device name.
Now we partition the disk:
  1. cfdisk /dev/sdb
Select the following options:
  • New > Primary > Enter (use the size in MB already specified)
  • Write
  • Quit
Now we format the disk to the ext3 filesystem:
  1. mkfs.ext3 /dev/sdb1
Mount the drive to a new folder:
  1. mkdir /mnt/backups
  2. mount -t ext3 /dev/sdb1 /mnt/backups
Lastly we add the disk to /etc/fstab so it auto-mounts when we reboot the machine:
  1. /dev/sdb1 /mnt/backups ext3 defaults,errors=remount-ro 0 1
That’s your drive mounted and ready to be added as backup storage in Proxmox.
To test: reboot the machine and confirm that the drive is still mounted.
Thursday, April 21, 2016